鎌倉プリント・コレクションへようこそ ・ フォトグラビュール 銅版画、ミラー・ピーター (Peter Miller)
Site:
Home・ホーム
Viewing・見聞
Learning・情報
Purchasing・ご注文
News ・ ニユース Videos・ビデオ Xpress
Series: Temples・寺 Dreamscapes・夢 Seascapes・海 Furusato・ふるさと Pathways・道 Mongolia・モンゴル Acts & Scenes・町 Unseen・見残す New Prints・新
Note: The video companion to this guide is here. 日本語 Japanese video. At Xpress you can search by mood -- Dynamic, Reflective, Mysterious, Sensual, Spontaneous, Expansive, Elegiac, Intimate, Luminous. Or by texture: Rough, soft, flowing, granular, linear, rhythmic. Also by ink, paper, image size, place, Series, and price. Original photogravure etchings may be ordered from any full-screen page (Hokokuji, for example), with this icon at the lower-right of the screen:  Viewers may also complete the Japanese inquiry form or the Japanese order form in any language. Payment for prints delivered in Japan may be made by C.O.D. (着払). For viewers who are learning the photogravure etching technique, having an original photogravufre etching at hand provides the best instruction, as well as inspiration to see you through the inevitable difficulties.
Technique of Intaglio Photogravure Printmaking, continued
- Prepare Positive Transparency
- Sensitize Resist
- Expose Resist
- Adhere Exposed Resist to Copperplate
- Develop Resist
- Etch Copperplate
- Pull a Proof
- Print the
Edition
- Chine Collé Printing
VII. Pull a Proof
- Ink, wipe, and print the etched copperplate in accordance with the printing instructions below.
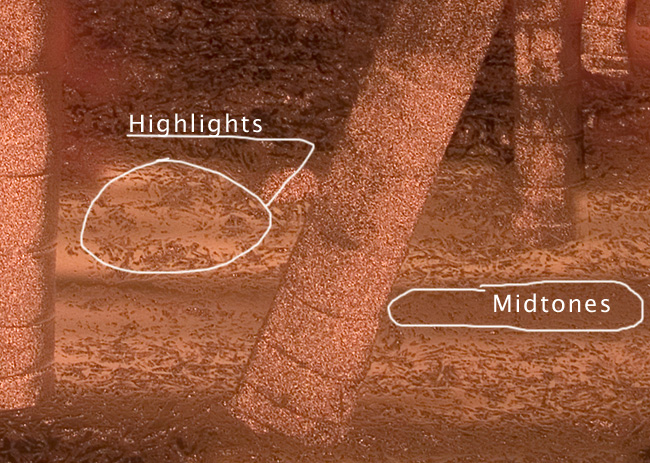
- See whether the proof has a full range of highlight and shadow detail, plate tone, as revealed by the variable depth of etching in the plate. Here is a deeply etched shadow area that will hold enough ink to print a rich deep black:
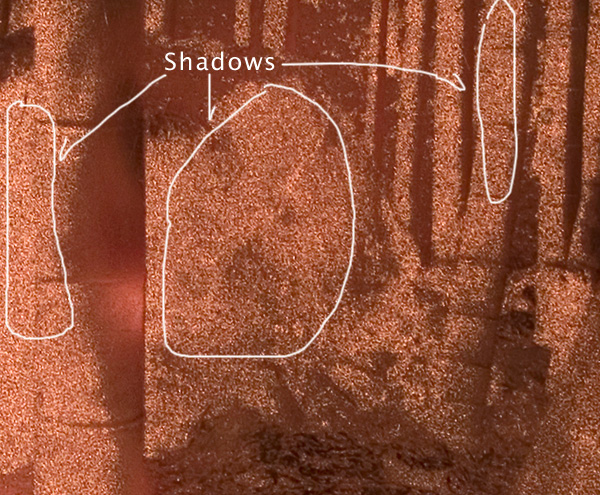
- Here is a lightly etched highlight area that will hold a slight amount of ink, only enough to outline detail and show plate tone:
- If a full range of tones is visible in the proof and there are no serious flaws, cut the plate to the size of the image, with or without a border as desired.
VIII. Print the Edition
- One or two days before printing, prepare a stack of the etching paper, alternating wet with dry sheets, wrap them in plastic, and place a flat weight on top. Use distilled or buffered water.
- The etching paper or washi should be soft, but without any surface water or excessive dampness.
- Adjust the pressure of the etching press so that it makes an even impression on either side. Some presses have vernier scales that enable such adjustment without proofing.
- Polish etched copperplate, and, using rubber gloves, de-grease plate by wiping it vigorously with a rag soaked in sodium hydroxide solution, until water flows off the plate smoothly. If the water beads up or is repelled by any spot on the plate, some grease remains. Keep at it until the copperplate is completely de-greased, so that the ink will transfer thoroughly to the etching paper.
- Next, brighten the plate with an acetic acid / salt solution. This removes the surface layer of oxidation and thus also promotes full ink transfer. Dry plate quickly to avoid tarnishing.
- Mix etching ink either from dry pigment together with cold-pressed linseed oil, or from prepared inks, kneading it repeatedly with a stiff ink knife until it has the desired tack or consistency. The ink should fall slowly off the knife, rather than flowing (Figure 6).
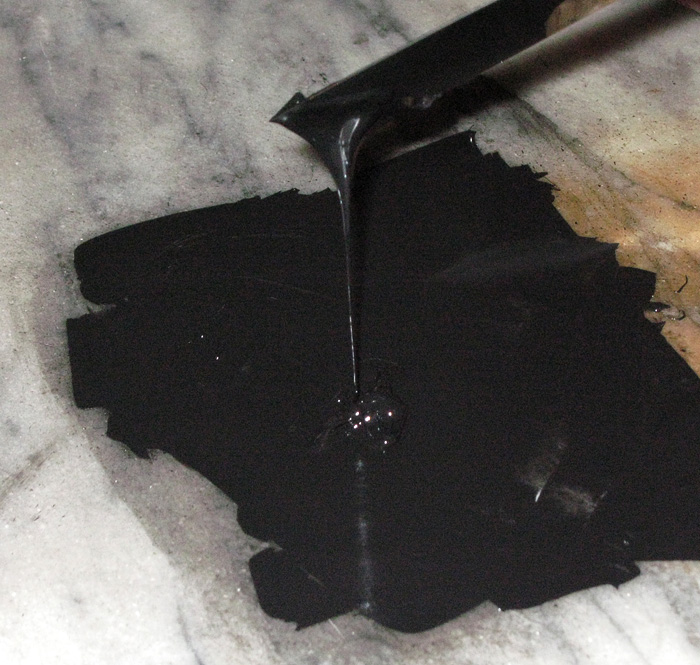
< 6> Etching ink
ready to be applied to copperplate
- Spread ink on clean copperplate with brayer, covering the whole plate evenly.
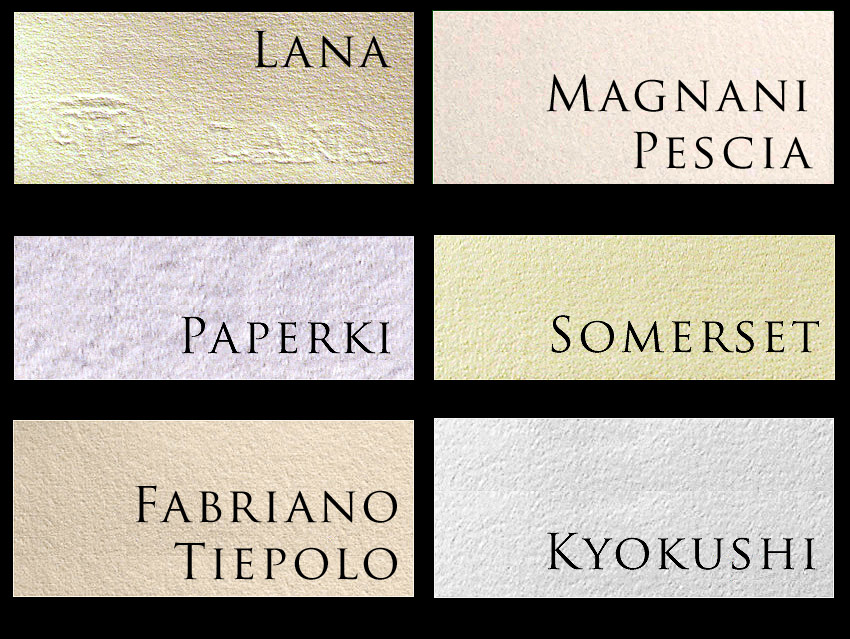
Etching papers (Figure 7) differ in how they take the ink, how absorbent they are, in tone, and in surface texture. Contrary to what one might think, the inked copperplate actually prints quite faithfully onto a rough-textured paper, giving a pleasing contrast between the image area and the texture of the margin. The great variety of texture and tone in hand-made etching papers is shown in these six examples, Lana Gravure from France, Magnani Pescia and Fabriano Tiepolo from Italy, Somerset from England, and Kyokushi from Japan:
Click here to continue.
Site:
Home・ホーム
Viewing・見聞
Learning
Purchasing・ご注文
News ・ ニユース Videos・ビデオ Xpress
Series: Temples・寺 Dreamscapes・夢 Seascapes・海 Furusato・ふるさと Pathways・道 Mongolia・モンゴル Acts & Scenes・町 Unseen・見残す New Prints・新
Original photogravure etchings may be purchased through this website by clicking the order button on any full-screen image page, or from these fine print dealers:
Baltimore: Conrad R Graeber Fine Art, Box 264, Riderwood, Md, U.S.A., tel +1-410-377-6713
San Francisco: Japonesque, 824 Montgomery Street, SF, Ca, U.S.A., tel +1-415 391-8860
Netherlands: Eric van den Ing, Saru Gallery, tel: +31(0)6-2246-4074.
Moscow: Lumiere Brothers Center, 119072, Red October, Bolotnaya emb 3 b. 1, Moscow, Russia, 119072), tel +7-968-451-4019
Vladivostok: Arka Gallery, 5 Svetlanskaya St, Vladivostok, Russia, tel +7-4232-410-526
 into your email (日本語 OK).