鎌倉プリント・コレクションへようこそ ・ フォトグラビュール 銅版画、ミラー・ピーター (Peter Miller)
Site: Home・ホーム; Viewing・見聞; Learning・情報; Purchasing・ご注文; News ・ ニユース; Videos・ビデオ Xpress
Series: Temples・寺; Dreamscapes・夢; Seascapes・海; Furusato・ふるさと; Pathways・道; Mongolia・モンゴル; Acts & Scenes・町; Unseen・見残す; New Prints・新
Note: The video companion to this guide is here. 日本語 Japanese video. At Xpress you can search by mood -- Dynamic, Reflective, Mysterious, Sensual, Spontaneous, Expansive, Elegiac, Intimate, Luminous. Or by texture: Rough, soft, flowing, granular, linear, rhythmic. Also by ink, paper, image size, place, Series, and price. Original photogravure etchings may be ordered from any full-screen page (Hokokuji, for example), with this icon at the lower-right of the screen:  Viewers may also complete the Japanese inquiry form or the Japanese order form in any language. Payment for prints delivered in Japan may be made by C.O.D. (着払). For viewers who are learning the photogravure etching technique, having an original photogravufre etching at hand provides the best instruction, as well as inspiration to see you through the inevitable difficulties.
Galleries where the prints may be seen and purchased are listed at the end of this page.
Technique of Intaglio Photogravure Printmaking
・日本語
- Prepare Positive Transparency
- Sensitize Resist
- Expose Resist
- Adhere Exposed Resist to Copperplate
- Develop Resist
- Etch Copperplate
- Pull a Proof
- Print the Edition
- Chine Collé Printing
Photogravure etchings are a type of intaglio print, made by transferring ink from the recesses of an etched or 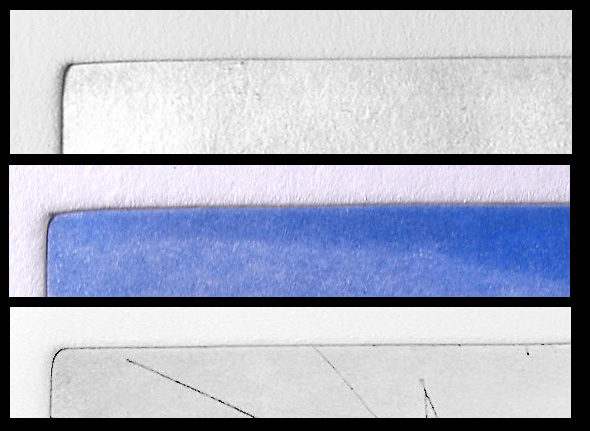 engraved copperplate to specially prepared paper. Etchings, engravings, aquatints, drypoints, mezzotints, and photogravures all require an etching press, the pressure of which creates a platemark (shown at right). This platemark, and the tonal nuance of the printed impressions, distinguishes intaglio works from woodblocks, lithographs, and silkscreens. Photogravure (also known as héliogravure, or gravure à l'aquatinte), uniquely among all the graphic arts, enables variable depth of etching, creating a great variety of tones and textures. These three-dimensional forms accentuate the light and shadow of the image, making it come alive in an unparalled way.
These various tones and textures work together with line, form, and composition to create an overall impression. The physical qualities of the print are inseparable from the impression or mood they evoke in the viewer. A rough surface might suggest a wild feeling, while a smooth or soft surface could evoke calm or tranquility. Flowing textures call to mind liquid forms, granular textures a sense of the particular (particle-like). Rhythmic textures are made up of repeating elements, from the amoeba-like shapes of the aquatint grain or screen to visible structures, in a recursive series of fractals at different scales of enlargement. Examples of each texture are shown by searching here. Xpress (a name combining quick-searching, expression, and etching press) also enables searches by mood, such as Dynamic, Reflective, Mysterious, Elegiac, Luminous, Intimate, and others, as well as by ink, paper, place, image size, and price.
The photogravure etching technique I use is based on the inventions of W H Talbot and Nicéphore Nièpce in the 1830s. The history of this technique and its relation to printmaking in Europe is sketched in my Inklings essay. This page and the two following describe in detail how to make photogravure etchings. These directions are based on my own experience; at each step of the way there are many variations that will give equally fine results. Much depends on local atmospheric conditions, variations in materials and supplies, water quality, and other factors. The only rule is to do whatever works.
I. Prepare Positive Transparency
- From a well-exposed photographic negative, make a black-and-white transparency on graphic arts film, or print a digital negative with pigmented ink (顔料) onto transparency material. The transparency should be less contrasty than the etching is expected to be. Unlike a conventional silver photo, the photogravure etching retains highlight and shadow detail, because the ultraviolet-sensitive resist responds in a completely linear manner to every increment of light. The transparency should also be the size of the intended etching, as it will be exposed in contact and not by projection.
- Mask the film transparency with red lithographers' tape to create a 'safe edge' about 15or 20 mm wide around the image area. Press the tape down from the center outward so that there are no creases or air bubbles. Prepare the digital transparency with a black-bordered 'safe edge' about 15 or 20 mm wide around the image. The purpose of the 'safe edge' is to prevent ultraviolet exposure and consequent frilling of the resist during later development.
- If a densitometer is available, develop the graphic-arts film or print the transparency material so that there is a density range of at least 1.5, for example a highlight density of 0.2 and a shadow density of 1.7. (Density is a numerical expression of opacity, on a scale of zero to three, of how much of the light is blocked.) This density range allows for full expression of all tones in the final print. While the transparency is less contrasty than theetching, the contrast will be recovered during the etching process.
Remove dust spots in film by applying spotting ink with a fine brush; in a digital transparency use the noise filter. Use selective sharpening in a digital image to avoid edge artifacts and grain, and to keep a natural look. For example, don't sharpen clouds or other features that do not benefit from a hard-edge look.
- From this point on, the technique is the same for film or digital transparencies.
II. Sensitize Resist ('Carbon Tissue')
- From carbon tissue supplied in 20-meter rolls, place weights on unrolled end and cut to size, making sure the gelatin coating does not crack.
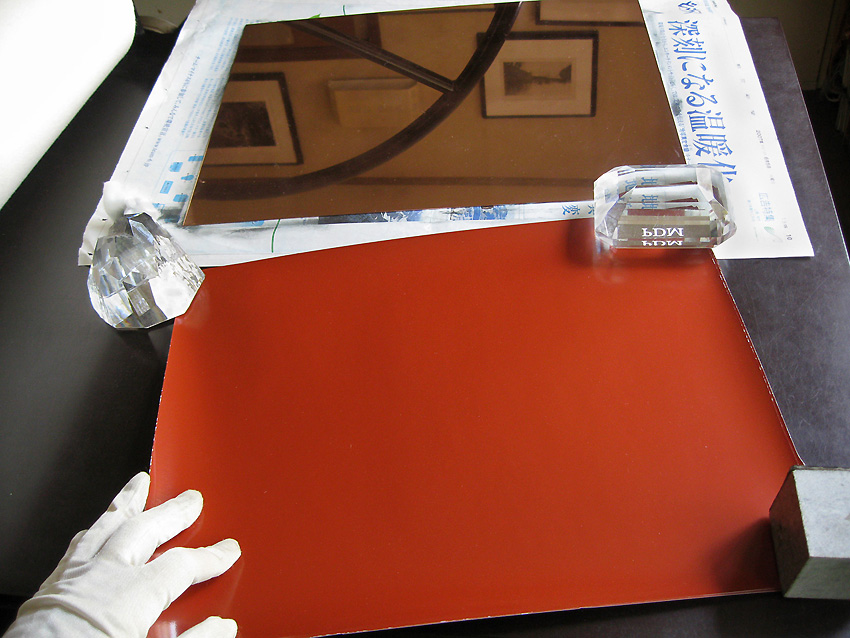
- Using cotton or synthetic gloves when handling the carbon tissue, cut pieces that are 1 - 2 cm larger than the transparency and 1-2 cm smaller than the copperplate. (The gloves are needed to prevent fingerprints and oils from contaminating the resist.)
- Store the cut sheets of carbon tissue flat between stiff boards, except those that will be used immediately. Secure with clips, wrap in foil or some other vapor barrier, and store it in the refrigerator if possible. Unsensitized carbon tissue can be stored this way for up to two years. Over time the tissue deteriorates and requires less and less UV exposure to produce the same light values, making calibration difficult.
- Under a 10-watt amber safelight at least one meter or yard away from the work surface, mix the sensitizer with distilled or de-ionized water. Dehumidifiers are a good source of distilled water. If the mixing is done with warm water, wait for it to cool to about 20° C. before using, then pour it into a tray which is used only for this purpose.
- With rubber gloves on (see safety recommendations for the sensitizer), place a cut sheet of the resist face up in the tray, noting the time. Hold the corners and edges down until it is fully immersed. At first it will have a tendency to curl, but after about a minute it will lie flat. Then pick up the carbon tissue and turn it face down, sliding it smoothly into the tray without any creases or bends. If the corners or edges protrude above the surface of the sensitizer, push them down into the resist solution, but not touching the bottom of the tray.
- After 3.5 minutes have elapsed since first immersing the carbon tissue in the sensitizer solution, pick up the resist by one corner and let it drip onto a piece of clean plexiglass. Larger pieces of carbon tissue may need to be picked up at two corners, so that it does not curl back and stick to itself. A longer immersion time gives higher sensitivity and lower contrast. Less immersion time increases contrast and lowers sensitivity.
- Holding two diagonally opposite corners, first set the center of the sensitized resist face down on the plexiglass, then set the corners down so that no air is trapped between the surfaces.
- Squeegee from the center outward with sufficient pressure to remove excess sensitizer and adhere the resist to the plexiglass, and to remove all remnants of trapped air, but not so hard as to weaken or distort the delicate gelatin. It is best to do this quickly, as the adhesion of the sensitized carbon tissue is firmest upon first contact.
- Dry the sensitized resist evenly by directing the air current from a fan over (not onto) the back of the resist. An apparatus to rotate the plexiglass-adhered carbon tissue is useful to ensure even drying. After about two hours (more if humidity is high), gently peel the sensitized carbon tissue off the plexiglass, making sure the surface does not crack. Usually the periphery dries before the center, but avoid the temptation to peel it off before entirely dry, otherwise a circular area of thicker resist will remain in the center.
III. Expose the Resist
- Handle the sensitized resist only with cotton or synthetic gloves, and only under an amber safelight to avoid contaminating or fogging it.
- Since each UV light source has a different intensity and spectrum, test UV exposure with step wedges (transparencies with a series of known densities) to indicate the proper exposure for a given UV light source. Always use a blackout curtain around any UV light source, and never look directly at a UV lamp when it is on. (See UV safety recommendations.) The test procedure is the same as the procedure for an actual transparency as described below. The exact time of ultraviolet exposure depends on the spectrum, intensity, and distance of each light source from the resist surface. It might vary from as little as 30 seconds to several minutes, depending on the equipment used.
- Adjust UV exposure as needed for aging of the carbon tissue, density of the transparency, sensitizer concentration, the order in which the resist has been soaked in sensitizer, and whether a light-toned or dark-toned gravure print is desired. For example, a very dense transparency might require more UV exposure than normal. If the same tray of sensitizer solution is used for more than one piece of resist, the first one has more sensitivity than succeeding ones. My rough estimate is that the second piece of resist requires a UV exposure of 17 percent more than the first piece, all other things (such as the positive density) being equal.
- If a screen is used as aquatint grain, expose the screen with 1.5X the image exposure, to ensure that the 'lands' of the plate will be more prominent than the brightest highlights of the image. A stochastic, or random-pattern screen is best, as it gives the closest resemblance to aquatint grain. Screens of various degrees of coverage are available; usually 70 percent or 80 percent gives good results.
- If an aquatint grain is used, let the largest grains in an aquatint box fall for about 30 seconds before placing the copperplate inside, assuring that only the finest grains fall on the plate. If additional coverage is needed, repeat the process -- remove the copperplate, pump or shake the aquatint box, wait 30 seconds, and replace the copperplate in the aquatint box, being careful not to disturb the first coating of aquatint grain while doing this.
- Position the masked transparency over the sensitized resist in the vacuum frame, taking care that the entire image area is covered. (This is the reason for cutting the carbon tissue to a size slightly larger than that of the transparency.)
- If an aquatint grain is used (see aquatint safety recommendations), expose the transparency only.
Ultraviolet light (UV) sets off a chemical reaction known as cross-linking or polymerization that hardens or crystallizes the gelatin. When exposed in contact with a transparency (Figure 1), the shadows block most of the ultraviolet (UV) light, leaving most of the gel soluble. Under the transparency's highlights which admit more UV, however, the gel hardens more. Metal-halide light sources give more consistent results and are safer to use than carbon-arc lamps.
The aquatint grain creates microscopic 'lands' on the copperplate which remain unetched. Particles of asphaltum are allowed to rain down on the copperplate and are then fused over high heat until they flow into an amoeba-like shape, as shown enlarged in Figure 2.
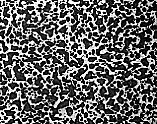
Figure 2. Aquatint grain (from Johan de Zoete, A Manual of Photogravure)
The unique look of photogravure depends on the variable depth of the etching, the ability of the copperplate to transfer far more ink to the shadows than to the highlights of the print, and to register subtle gradation of tone. What enables the plate to be etched to various depths is the linear sensitivity of dichromated gelatin to ultraviolet light. Unlike conventional silver-based photographic materials, dichromated gelatin is sensitive to every nuance of light intensity in equal measure. This enables it to register highlight and shadow detail not found in conventional photographs. The gelatin resist is partially permeable: It allows the etchant to seep through depending on how thick or thin the gel is. Where the gel is thin, etching is deep, and where thick the etching is shallow. The deeply etched parts of the plate hold more ink and form the dark parts of the gravure print, the lightly etched parts less ink, creating the highlights. Westwind, Cross-currents, Discovery, Tivoli, Meigetsuin, and Roofwork are examples of prints made from deeply etched plates.
<3> Cross-linking of UV-exposed Resist
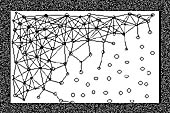 Molecules of gelatin activated by UV light bind to one another in long chains through a mechanism known as cross-linking (Figure 3). Cross-linking makes the resist more or less insoluble depending on how far it extends through the gelatin. The amount of cross-linking, remarkably, tracks the amount of UV precisely, even at the extremes of light and darkness. While ordinary photographic films and papers miss the near-whites and near-blacks because of their uneven sensitivity, UV-sensitive materials register the finest gradations of tone faithfully. Snow tones, for example, are visible in Niseko, Myoko, Kumonodaira, Myoko-4, and Notes From Last Time.
IV. Adhere Exposed Resist to Copperplate
- Remove any scratches from copperplate by scraping and burnishing with plate oil.
- Polish copperplate with metal polish.
- De-grease copperplate with fresh sodium hydroxide solution, followed by a fresh acetic acid / salt solution, wiping each time with a clean rag. If the water beads up, repeat until the water flows smoothly off the surface of the copperplate. The slightest impurity can cause poor adhesion of the resist and ruin the etch.
- Dry copperplate quickly by blotting with paper towel in front of fan, so that there is no tarnishing, and place it conveniently to hand.
- Soak exposed resist in distilled water one minute -- don't over-soak.
- Immerse the clean copperplate in 27° C. distilled water.
- Quickly adhere one edge of the exposed resist to the copperplate, carefully aligning it just inside the edge of the plate, with no overhang. Pull both quickly out of the warm water, and position the copperplate on a stable surface. Squeegee or roll over the resist from the center outward until it is firmly adhered to the copperplate, making sure no air is trapped between the two surfaces. If there is a slight overhang due to misalignment, cut off the looose portion of the resist, assuming it is not large enough to include any part of the image.
- Wipe excess liquid off the back of the adhered resist, and let it dry ('cure') for one or two hours. Moderate pressure may be useful but seems not to be essential.
V. Develop the Resist
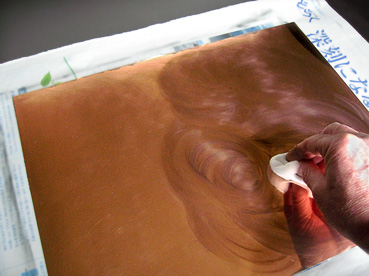
- Swab the back of the adhered resist with a mixture of alcohol and water, to accelerate peeloff of the backing paper. Immerse the plate, with the exposed resist adhered to it, in warm (27° C.) water, gradually increasing the temperature to 41° C. until the backing sheet is loose enough to peel off without dislodging the resist. With some newer resist tissue, the alcohol swab is not necessary.
- After a few minutes, preferably no more than five minutes, peel off backing sheet slowly, with warm water flow turned off so that the delicate resist is not damaged. If the peeloff doesn't proceed smoothly, don't force it, otherwise the image will peel off.
- Agitate plate gently in 41° C. water for about five minutes until all the unexposed resist is washed off. Swab very gently with clean wet cotton to remove unexposed resist faster, being careful not to leave streaks or marks in the wet resist. The 15-mm 'safe edge' prevents the edge of the image area of the patterned resist from washing away. The image becomes faintly visible in the hardened resist that remains on the plate after the unexposed resist has been washed off. The total warm-water immersion time must be minimized to prevent bubbles and blisters from forming in the resist. (These problems typically occur in over-exposed resist, so use only the minimum UV exposure required to give adequate shadow coverage.)
- While the copperplate with the patterned resist is still immersed, cool the water gradually by adding cold water; then remove the copperplate and place it in a tray with alcohol / water solution for 30 seconds. The alcohol can be 50% to 80%, depending on the type of resist tissue used, and previous experience with the proper rate of drying.
- Remove the plate from the alcohol / water solution, hold it at an angle, and immediately rotate it while drying the edges with a paper towel or rag. Do not allow water to flow back onto the image area, so that the image area dries evenly. Keep rotating the plate and drying the edges for 10 or 15 minutes. In large images, if evaporation is slow, water may tend to pool in the center or in areas of thick resist. If this appears to be happening, accelerate drying with a fan directed over but not onto the plate.
- Set the plate in a vertical position, and rotate it 90 degrees every 15 minutes for one or two hours, to ensure even drying of the resist. Areas of thick resist, such as sky or other highlights, are particularly difficult to dry evenly, and these must be watched carefully for any signs of flow, pooling, or other unevenness.
- With a 10X or 15X loupe, inspect the plate for flaws such as bubbles, blisters, under-exposure, over-exposure, resist breaks, mottling, wave patterns, poor adhesion, etc. As a general rule, it is easier to scrub off the patterned resist and start over than to repair the flaws that inevitably result from etching a damaged resist.
- If the inspection shows a well-modulated range of tones so that both shadows and highlights can be etched while retaining full detail, and there are few or no flaws in the patterned resist, let it dry in a dust-free room for about 15 to 20 hours. The longer it dries, the harder the resist will be, a fact which can be used to increase or decrease etching time as needed.
Figure 4. Patterned Resist on Plate
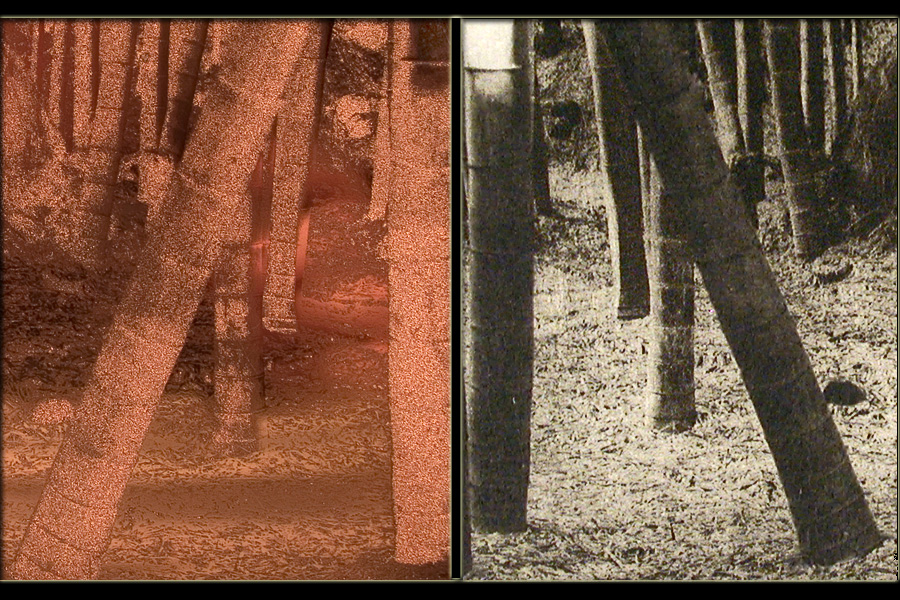
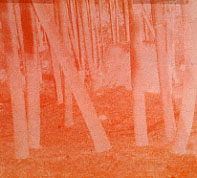 The dried resist looks like a laterally reversed negative (Figure 4), light in the shadows (where the resist is thin) and dark in the highlights (where the resist is thick). It is actually a cast of the image that shapes the action of the etchant in the next step. To prepare the plate for etching, mask the image area and the back of the plate with packaging tape. The print made from this plate
is Hokokuji, showing a bamboo garden in Kamakura. (The original print may be purchased here.)
The dried resist looks like a laterally reversed negative (Figure 4), light in the shadows (where the resist is thin) and dark in the highlights (where the resist is thick). It is actually a cast of the image that shapes the action of the etchant in the next step. To prepare the plate for etching, mask the image area and the back of the plate with packaging tape. The print made from this plate
is Hokokuji, showing a bamboo garden in Kamakura. (The original print may be purchased here.)
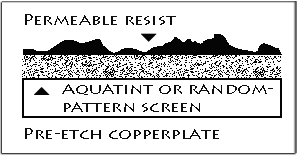 Figure 5 shows an enlarged cross-section of the copperplate ready for etching, with aquatint grain or screen pattern below the permeable gelatin resist. A random-pattern screen may be used instead of the aquatint grain to create unetched 'lands' on the plate.
<5> Pre-etch copperplate
VI. Etch the Copperplate
- Mask the image area of the patterned resist on the copperplate with packaging tape, and apply stopout to any breaks in the resist. Where the tape meets at the corners, smooth it down so that no etchant can get through.
- Prepare a series of ferric chloride solutions ranging from 45-Baumé to 37-Baumé (a measure of concentration) at 20° C. (68° F.). Dilute the solutions, usually supplied as 45-Baumé, with distilled water, allowing time for the water and ferric chloride to mix thoroughly. Pour the etchant into four or five trays arranged from most to least concentrated.
- Place the positive transparency where it is visible, and identify the darkest areas, midtones, and highlights, in order to follow the progress of the etching.
- Wearing rubber gloves and a lab apron, immerse the copperplate in the most concentrated (highest Baumé) solution of ferric chloride and note the starting time.
- Move the plate to the next, more dilute solutions in sequence, watching for etching to begin. Etching begins when the ferric chloride seeps through the resist and touches copper, causing a flow of dark precipitate. Note the time when this shadow etching begins. Typically shadow etching begins after five to 10 minutes. (If it takes too long, the resist has been over-exposed.)
- If no new areas of the plate are being penetrated, move the plate to the next, more dilute solution to start midtone etching, and note the time when that begins.
- Try to pace the etching so that the shadows etch for at least 10 minutes, preferably 15 minutes, while the brightest highlights etch for two minutes or less, with the total etching time between 20 and 30 minutes. This is where we recover the contrast that was intentionally limited in the positive transparency. Each tone etches separately, enabling deep etching of the shadow tones if desired, as in Meigetsuin, or less deeply, as in Ainokura.
- Let the highlights etch only briefly in the most dilute solution of ferric chloride. If the resist was over-exposed enough to slow highlight penetration, try breathing on the plate; the moisture in the breath helps the etchant to get through stubborn resists.
- End the etch by immersing the plate in cold water and moving it around to remove all the etchant.
- Scrub off the resist and aquatint grain (if any), and clean the plate with alternating baths of sodium hydroxide (NaOH, a strong base) and a solution of acetic acid mixed with salt (80% water - 10% acetic - 10% salt by volume).
- Inspect for etching flaws with a 10X or 15X loupe. Any irregularities in resist drying will show up as unwanted light areas replicating the shape of where water pooled or flowed. Resist breaks not covered with stopout etch as deep pits that leave dark spots in the print. Poor adhesion between resist and copperplate may result in horizontal seepage of etchant, causing asterisk-shaped 'devils' to appear.
 If the plate has been fortunate enough to escape these flaws, and has a full range of tones, it stands a good chance of producing a fine print. Figure 6 shows in enlarged cross-section how some parts of the plate are etched much more deeply than others. When printed, they will transfer more ink to the etching paper.
The etched plate for Hokokuji:
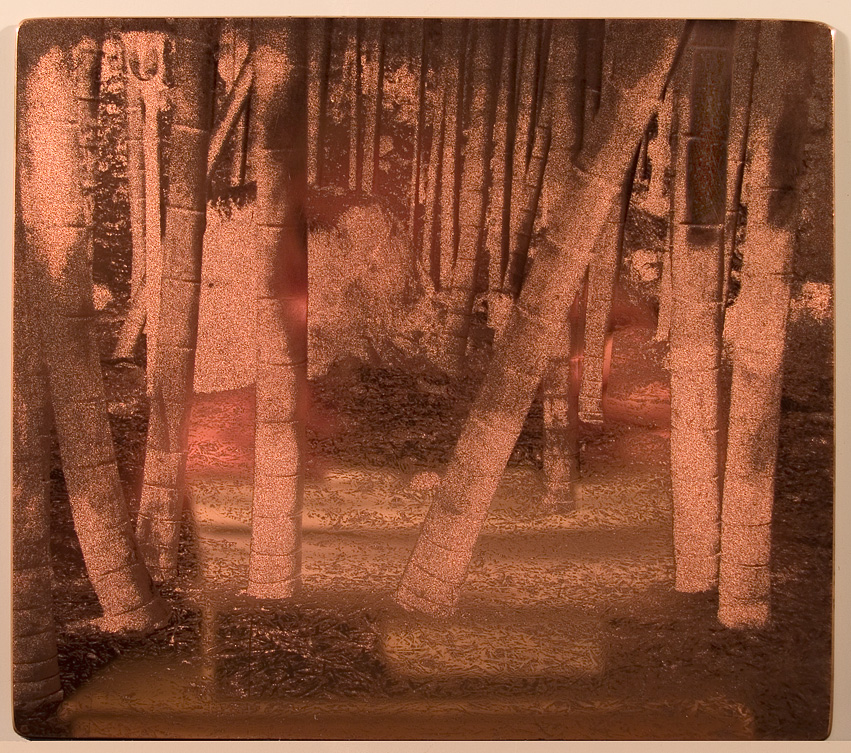
Closeup of etched plate and print made from it:
[Click here
to continue] > >
Site: Home・ホーム; Viewing・見聞; Learning・情報; Purchasing・ご注文; News ・ ニユース; Videos・ビデオ Xpress
Series: Temples・寺; Dreamscapes・夢; Seascapes・海; Furusato・ふるさと; Pathways・道; Mongolia・モンゴル; Acts & Scenes・町; Unseen・見残す; New Prints・新
Original photogravure etchings may be purchased through this website by clicking the order button on any full-screen image page, or from these fine print dealers:
Baltimore: Conrad R Graeber Fine Art, Box 264, Riderwood, Md, U.S.A., tel +1-410-377-6713
San Francisco: Japonesque, 824 Montgomery Street, SF, Ca, U.S.A., tel +1-415 391-8860
Netherlands: Eric van den Ing, Saru Gallery, tel: +31(0)6-2246-4074.
Moscow: Lumiere Brothers Center, 119072, Red October, Bolotnaya emb 3 b. 1, Moscow, Russia, 119072), tel +7-968-451-4019
Vladivostok: Arka Gallery, 5 Svetlanskaya St, Vladivostok, Russia, tel +7-4232-410-526
 into your email (日本語 OK).