Note: The video companion to this guide is here. 日本語 Japanese video. At Xpress you can search by mood -- Dynamic, Reflective, Mysterious, Sensual, Spontaneous, Expansive, Elegiac, Intimate, Luminous. Or by texture: Rough, soft, flowing, granular, linear, rhythmic. Also by ink, paper, image size, place, Series, and price. Original photogravure etchings may be ordered from any full-screen page (Hokokuji, for example), with this icon at the lower-right of the screen:  Viewers may also complete the Japanese inquiry form or the Japanese order form in any language. Payment for prints delivered in Japan may be made by C.O.D. (着払). For viewers who are learning the photogravure etching technique, having an original photogravufre etching at hand provides the best instruction, as well as inspiration to see you through the inevitable difficulties.
Some workshops strive for uniformity across the entire edition, while others prefer some variety of interpretation. The ultimate in uniformity is a poster or other reproduction made without any particular individual touch or style.
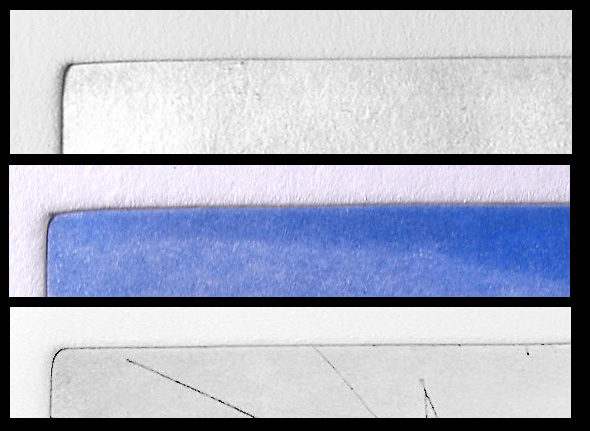
The pressure of the etching press creates a platemark (Figure 9), a distinguishing feature of photogravure etchings and of all intaglio prints. The platemark embossment is a sign of hand-made authenticity.
You can purchase a real photogravure etching for as little as $150; having one nearby could inspire you to learn and practice the technique. These prints are shown here. For any questions about technique or purchasing, please contact me at the email address at the bottom of this page.
Please take the greatest care when mixing, using, and storing these chemicals. With proper safeguards as recommended below, they are safe to use. Of course everyone is responsible for their own safety, and no liability is implied or assumed by the provider of this information.
Formulas
| Water |
800 ml |
1500 ml |
4000 ml |
| Sodium hydroxide |
20 gr |
40 gr |
100 gr |
| To make working solution |
1 liter |
2 liters |
5 liters |
USE RUBBER GLOVES AND WEAR PROTECTIVE GOGGLES. Mix carefully,
a small amount at a time, stirring until thoroughly dissolved
before adding more. If too much sodium hydroxide is poured in at
one time, the solution heats up rapidly and may bubble over or
splatter. Do not allow skin contact. This solution removes grease
from the copperplate surface, which is essential for proper
adhesion of the resist. Clean thoroughly and vigorously with a
rag, using fresh solution as many times as necessary. When water
flows off the plate in sheets and does not form droplets on the
surface, the de-greasing is complete.
Acetic acid and salt brightening
solution (ingredients by volume)
| Water |
800 ml |
1500 ml |
4000 ml |
| Acetic acid (glacial) |
100 ml |
200 ml |
500 ml |
| Salt |
100 ml |
200 ml |
500 ml |
| To make working solution |
1 liter |
2 liters |
5 liters |
USE RUBBER GLOVES, HAVE VENT ON OR OPEN WINDOW, AND WEAR
PROTECTIVE GOGGLES. ALWAYS POUR ACID INTO WATER, NOT WATER INTO
ACID. DO NOT BREATHE ACETIC ACID FUMES. Quickly clean copperplate
using a clean rag with this solution, rinse plate, and dry it
quickly by patting with a paper towel to prevent oxidation. This
solution forms mild hydrochloric acid, which lightly etches the
plate surface, so the operation must be performed quickly.
Flowing alcohol over the plate accelerates drying.
Sensitizer for Resist
| Water |
800 ml |
1500 ml |
4000 ml |
| Potassium dichromate |
35 gr |
70 gr |
175 gr |
| Ammonia |
1 ml |
2 ml |
5 ml |
| To make working solution |
1 liter |
2 liters |
5 liters |
USE RUBBER GLOVES, HAVE VENT ON, WEAR PROTECTIVE GOGGLES.
POTASSIUM DICHROMATE IS EXTREMELY TOXIC BY SKIN CONTACT. DO NOT
BREATHE AMMONIA FUMES. SEE SAFETY
PRECAUTIONS. Under an amber safelight, mix potassium
dichromate powder into water slowly, stirring continuously until
completely dissolved. If possible, use distilled water. A
dehumidifier provides a free source of distilled water. Add
ammonia to alkalize the sensitizer solution. If the sensitizer
solution is acidic, oxidation of the copper surface may occur
during adhesion of the resist, interfering with adhesion. This
table indicates a 3.5 percent solution. For more contrast with
lower sensitivity, use a 3.0 percent solution. For less contrast
with higher sensitivity, use a 4.0 percent solution. DO NOT ALLOW SKIN CONTACT WITH POTASSIUM DICHROMATE. IF SKIN CONTACT OCCURS, FLUSH IMMEDIATELY WITH COLD WATER.
Original photogravure etchings may be purchased through this website by clicking the order button on any full-screen image page, or from these fine print dealers:
Baltimore: Conrad R Graeber Fine Art, Box 264, Riderwood, Md, U.S.A., tel +1-410-377-6713
San Francisco: Japonesque, 824 Montgomery Street, SF, Ca, U.S.A., tel +1-415 391-8860
Netherlands: Eric van den Ing, Saru Gallery, tel: +31(0)6-2246-4074.
Moscow: Lumiere Brothers Center, 119072, Red October, Bolotnaya emb 3 b. 1, Moscow, Russia, 119072), tel +7-968-451-4019
Vladivostok: Arka Gallery, 5 Svetlanskaya St, Vladivostok, Russia, tel +7-4232-410-526
 into your email (日本語 OK).